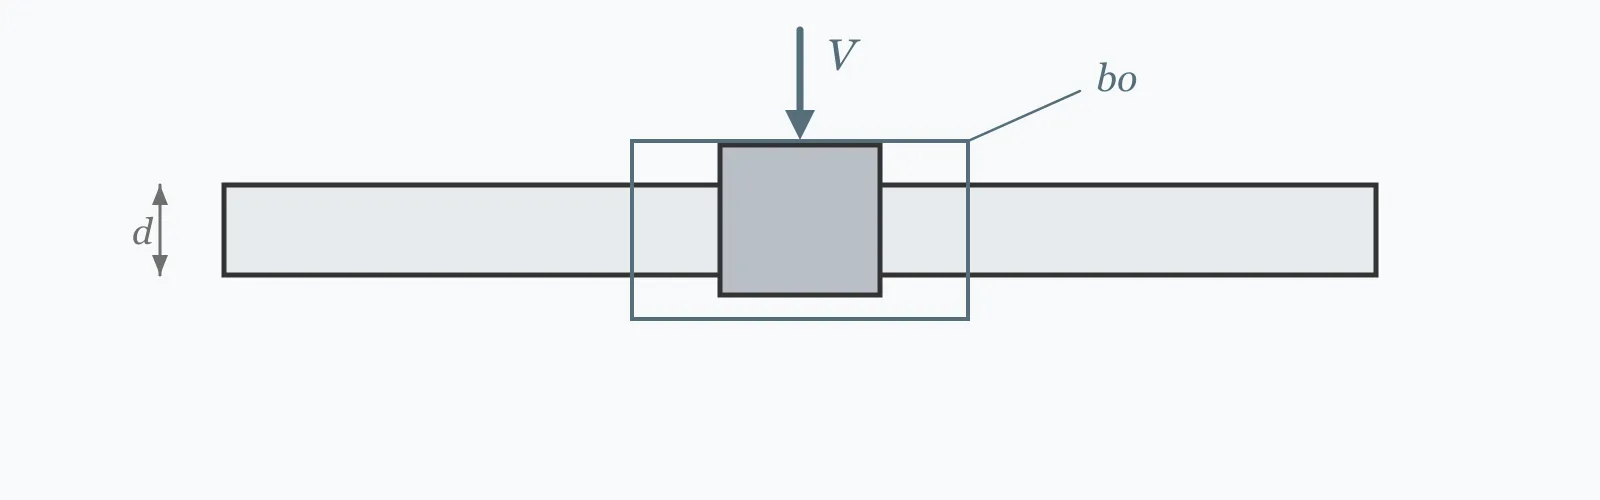
Punching shear is checked on a perimeter set d/2 from the column face, giving bo = 2(c₁+d) + 2(c₂+d). The nominal concrete capacity is Vc = 0.33√f'c·bo·d. Enter the column dimensions, slab effective depth and concrete strength to get both. Multiply by ϕ = 0.75 for the design value, and note that effective depth is by far the most powerful variable.
Calculator
Units:
mm
First plan dimension of the column
mm
Second plan dimension of the column
mm
To the centroid of tension steel — not the overall slab thickness
MPa
Specified 28-day compressive strength
Calculation Result
Press Calculate for the critical perimeter and the nominal shear capacity. This is Vc, the concrete contribution: multiply by ϕ = 0.75 for the LRFD design capacity, and compare against the factored shear transferred at the connection.
Step-by-Step Solution
Preliminary design aid. Results follow the published formulas cited
below and are intended for estimating, study and early design. Final design must be
verified by a licensed Professional Engineer against the code in force for your project.
Key Benefits
✓Computes the ACI critical perimeter at d/2 from the column face
✓Returns nominal two-way shear capacity in one step
✓Makes the double dependence on effective depth explicit
✓Sets out the moment transfer and shear reinforcement checks that must follow
✓Sensitivity chart shows how steeply capacity climbs with slab depth
✓Shareable links and CSV export for design records
What Is Punching Shear?
Where a flat slab meets a column, the entire tributary load must pass through a small area of slab. That transfer creates shear stresses on a surface surrounding the column, and if they exceed what the concrete can carry, a truncated cone punches through. ACI 318 checks this on a critical perimeter located d/2 from the column face, where d is the effective depth. For a rectangular column the perimeter is bo = 2(c₁+d) + 2(c₂+d).
Why effective depth matters twice
Capacity is Vc = 0.33√f'c·bo·d, and d appears in both bo and the final term. Increasing the slab depth widens the critical perimeter and deepens the resisting section at the same time, so capacity grows faster than linearly — roughly with the square of depth for a small column. This is why adding 25 mm to a flat slab is such an effective response to a punching problem, and equally why losing 25 mm to a fixing error is so damaging.
What this calculation does not include
Vc is the concrete contribution to two-way shear at an interior column with a compact aspect ratio. ACI gives three expressions and requires the least: the 0.33 coefficient governs only when the column aspect ratio β is at most 2 and the perimeter is not long relative to the depth. Unbalanced moment transfer, which adds shear stress on one face of the perimeter, is a separate and frequently governing check, as is the reduced perimeter at edge and corner columns.
Concrete contribution to two-way shear resistance, before the resistance factor.
b_o
Critical Perimeter
mm
Perimeter of the critical section, located d/2 from the column face on all sides.
c₁
Column Width
mm
First plan dimension of the column.
c₂
Column Depth
mm
Second plan dimension of the column.
d
Effective Depth
mm
Slab depth to the centroid of tension steel. Enters the calculation twice, making it the dominant variable.
f'c
Concrete Strength
MPa
Specified compressive strength. Enters under a square root, so its effect is muted.
ϕ
Resistance Factor
—
0.75 for shear in LRFD, applied to the nominal capacity.
How to Use This Calculator
Use the effective depth, not the slab thicknessEffective depth is measured to the centroid of the tension reinforcement: slab thickness minus cover minus half the bar diameter, and for two-way steel, use the average of the two layers. A 200 mm slab typically gives about 160 mm effective depth.
Enter the actual column dimensionsBoth plan dimensions are needed, since the perimeter follows the column shape. For a circular column, ACI permits a square of equivalent area to be used.
Apply the resistance factorThe result is nominal capacity. Multiply by ϕ = 0.75 to get the design value, then compare against the factored shear from the governing load combination.
Check the column aspect ratioThe 0.33 coefficient applies where the long-to-short column ratio β is at most 2. For elongated columns and walls, the 0.17(1 + 2/β) expression gives a lower value and governs instead.
Then check moment transfer and edge conditionsUnbalanced moment at the connection adds shear stress on one face of the perimeter and frequently governs, particularly at edge and corner columns where the perimeter is already reduced.
Worked Examples
Example 1
A flat slab has an effective depth of 150 mm and sits on a 300 × 300 mm interior column. Concrete strength is 30 MPa. Find the punching shear capacity.
Step-by-Step Solution
Critical perimeter sides: c₁ + d = 300 + 150 = 450 mm, and c₂ + d = 300 + 150 = 450 mm
Critical perimeter: bo = 2(450) + 2(450) = 1,800 mm
Column aspect ratio β = 300/300 = 1.0, which is at most 2, so the 0.33 coefficient applies
Comparison: capacity rose from 488 to 723 kN, a 48% increase, for a 33% increase in depth
The disproportion is the point: d enters both bo and the final term, so capacity grows faster than depth does.
It cuts the other way too. If the top steel is fixed 20 mm lower than detailed, effective depth drops from 150 to 130 mm and capacity falls to 404 kN — a 17% loss from a fixing tolerance, which is exactly how punching failures happen on site.
Effective Depth Sensitivity
Capacity climbs steeply with effective depth because d enters twice — once through the critical perimeter and again as the resisting depth. Switch to the perimeter curve to see the first of those effects on its own. The marker shows your current depth.
Shear Capacity (Vc) vs Effective Depth (d)
Recomputed live from your inputs. The marker shows your current value.
Line chart of Shear Capacity (Vc) against Effective Depth (d). The same
values are listed in the data table below.
Values plotted above, sampled across the effective depth (d) range.
How to Interpret Your Results
Capacity alone means nothing without the demand it must resist. The bands below relate the computed nominal value to the design capacity it implies and the checks that must accompany it.
Shear Capacity (Vc): < 200Low punching capacity
A nominal capacity of your result kN gives only your result × 0.75 as the design value, which is modest for a flat slab connection. Verify the factored shear carefully, and expect that shear reinforcement or a drop panel will be needed unless the tributary area is small.
Shear Capacity (Vc): 200 – 800Typical flat slab range
A nominal capacity of your result kN is normal for a flat slab on a conventional column. Apply ϕ = 0.75, compare against the factored shear, and run the unbalanced moment transfer check — it governs more often than the direct shear check does.
Shear Capacity (Vc): ≥ 800High punching capacity
A nominal capacity of your result kN indicates a deep slab, a large column, or both. Direct punching is unlikely to govern, but confirm the moment transfer check and, on a deep section, that the perimeter is not so long relative to depth that a different ACI expression applies.
A critical perimeter of your result mm is short, which means a small column, a thin slab, or both. Consider a column head or drop panel: enlarging the perimeter is usually cheaper than thickening the whole slab, and it addresses the problem exactly where it occurs.
Common Mistakes to Avoid
Using slab thickness instead of effective depth
Why it matters:Effective depth is typically 40 to 50 mm less than the overall thickness. Since d enters the calculation twice, using the gross thickness can overstate capacity by 30% or more.
✓How to avoid it:Compute d as thickness minus cover minus half the bar diameter, averaged over the two reinforcement directions in a two-way slab.
Applying the 0.33 coefficient to an elongated column
Why it matters:ACI requires the least of three expressions. For a column with an aspect ratio above 2, the 0.17(1 + 2/β) form gives a lower capacity, and using 0.33 overstates it.
✓How to avoid it:Compute all three ACI expressions and take the smallest. Wall-like supports and long rectangular columns routinely fall outside the simple case.
Ignoring unbalanced moment transfer
Why it matters:Where the slab transfers moment to the column — which happens at every edge column and under any unbalanced load pattern — a fraction of that moment is carried by eccentric shear on the critical perimeter, adding to the direct stress on one face.
✓How to avoid it:Run the combined stress check of ACI 318 §8.4.4.2. At edge and corner columns it usually governs, and it is the mechanism behind most flat slab failures.
Using the interior column perimeter at an edge
Why it matters:At an edge or corner, the critical perimeter is truncated by the slab boundary — three sides at an edge, two at a corner. Using the full four-sided perimeter overstates capacity by a third or a half.
✓How to avoid it:Draw the perimeter to the actual slab edge. Corner columns have the least perimeter and the highest moment transfer, and are the most critical location in a flat slab.
Treating the concrete capacity as the whole answer
Why it matters:Where Vc is insufficient, shear reinforcement can be added — studs, stirrups or shearheads — but the concrete contribution is then reduced and an upper limit applies regardless of how much reinforcement is provided.
✓How to avoid it:Follow ACI 318 §22.6.6 for reinforced sections, which reduces Vc to 0.17√f'c and caps the total. Beyond that cap, only a thicker slab or a larger column will do.
Ignoring openings near the column
Why it matters:A service opening within about ten slab thicknesses of the column removes part of the critical perimeter, in proportion to the angle it subtends from the column centre. A modest opening can remove 20% of the capacity.
✓How to avoid it:Deduct the ineffective perimeter length per ACI 318 §22.6.4.3, and keep openings away from column zones wherever the layout allows.
Practical Applications
▸Checking flat slab and flat plate connections at columns
▸Sizing drop panels and column heads
▸Determining whether shear studs or stirrups are required
▸Assessing pile caps for punching around a column or pile
▸Checking pad foundations for punching under a column
▸Evaluating existing flat slabs during change-of-use assessment
Industry Use Cases
Flat slab building design
Punching shear at the columns usually sets the slab depth for an entire floor, rather than bending anywhere in the span. Designers commonly settle on a thinner slab with shear studs at the columns, which costs less than thickening the whole floor to avoid them.
Structural assessment and refurbishment
Flat slabs built before shear reinforcement was routine are a known vulnerability, and the failure mode gives no warning. Assessing an existing slab for a change of use starts at the columns, and the effective depth is measured by cover meter rather than taken from the drawings.
Foundation design
Pad footings and pile caps punch in exactly the same way, with the column pushing through the base. Because footings are thick, punching often sets the depth and therefore the concrete volume of the entire foundation.
Expert Tips
💡Effective depth is the dominant variable because it enters twice — capacity grows faster than depth does.
💡A drop panel enlarges the perimeter locally and is usually cheaper than thickening the whole slab.
💡Corner columns are the most critical: least perimeter, most moment transfer.
💡Concrete strength enters under a square root, so it is a weak lever compared with depth.
💡Check the effective depth achieved on site — 20 mm of fixing tolerance can cost 17% of capacity.
💡Where shear reinforcement is needed, studs are faster to fix than stirrups and perform better in thin slabs.
Advantages & Limitations
Advantages
✓Direct implementation of the ACI critical perimeter and capacity expressions
✓Returns the perimeter as well as the capacity, so the geometry is visible
✓Fast enough to compare slab depths during scheme design
✓Applies equally to slabs, pad footings and pile caps
✓Simple enough to check by hand in a design review
Limitations
!Covers interior columns only; edge and corner perimeters are truncated
!Uses the 0.33 coefficient, valid only for column aspect ratios up to 2
!Returns nominal capacity, so ϕ = 0.75 must be applied by the user
!Excludes unbalanced moment transfer, which frequently governs
!Takes no account of openings near the column, which reduce the perimeter
!Does not size shear reinforcement or apply the reduced Vc that accompanies it
!Assumes normalweight concrete; lightweight requires a further reduction factor
Capacity by Effective Depth and Column Size
Nominal capacity at 30 MPa concrete. Depth outperforms column size because it enters twice, but enlarging the column locally through a head or drop panel achieves a similar effect where thickening the whole slab is not viable.
Interior columns in 30 MPa concrete, aspect ratio 1.0. Design values apply ϕ = 0.75. Unbalanced moment transfer is a separate check.
A brittle failure in which a cone of concrete pushes through a slab around a column, driven by the concentration of shear where the entire tributary load transfers into a small area. It occurs without warning and without redistribution.
How do I calculate the critical perimeter?
Take it d/2 from the column face on every side, giving bo = 2(c₁+d) + 2(c₂+d) for a rectangular interior column. A 300 × 300 mm column in a slab with 150 mm effective depth gives 1,800 mm.
What is the punching shear capacity formula?
Vc = 0.33√f'c·bo·d in SI units, giving newtons. ACI requires the least of three expressions; the 0.33 form governs where the column aspect ratio is at most 2 and the perimeter is not long relative to the depth.
Why is effective depth so influential?
Because it appears twice — it widens the critical perimeter and deepens the resisting section simultaneously. Increasing depth from 150 to 200 mm, a third more, raises capacity by 48%.
What is the difference between effective depth and slab thickness?
Effective depth is measured to the centroid of the tension reinforcement, so it is thickness minus cover minus half the bar diameter — typically 40 to 50 mm less. Using thickness in place of it overstates capacity by 30% or more.
How do I increase punching shear capacity?
In order of effectiveness: increase the effective depth, add a drop panel or column head to enlarge the perimeter, add shear reinforcement such as studs, or enlarge the column. Concrete strength helps least, since it enters under a square root.
What happens at edge and corner columns?
The critical perimeter is truncated by the slab edge — three sides at an edge, two at a corner — so capacity falls sharply. Corner columns also carry the largest unbalanced moment, making them the most critical location in a flat slab.
Does unbalanced moment affect punching shear?
Substantially. A fraction of the moment transferred to the column is carried by eccentric shear on the critical perimeter, adding stress on one face. This combined check governs at most edge columns and is the mechanism behind most recorded flat slab failures.
What shear reinforcement is used in slabs?
Headed shear studs on rails are the most common, being fast to fix and effective in thin slabs. Closed stirrups and structural shearheads are alternatives. All reduce the concrete contribution to 0.17√f'c and are subject to an overall capacity cap.
Do openings near a column reduce capacity?
Yes. An opening within about ten slab thicknesses of the column removes the part of the perimeter it shadows, in proportion to the angle subtended from the column centre. Even a modest service opening can remove 20% of the capacity.
Glossary
Punching shear
Two-way shear failure in which a cone of concrete is pushed through a slab around a concentrated load or column.
Critical perimeter (bo)
The perimeter located d/2 from the column face on which two-way shear stress is checked.
Effective depth (d)
Distance from the compression face to the centroid of tension reinforcement.
Flat slab
A slab supported directly on columns without beams, relying on the slab-column connection to transfer shear.
Drop panel
A local thickening of the slab around a column, increasing both the effective depth and the critical perimeter.
Column head
A flared enlargement at the top of a column, increasing the critical perimeter at the connection.
Unbalanced moment
Moment transferred between slab and column, part of which is carried as eccentric shear on the critical perimeter.
Shear stud rail
A row of headed studs welded to a rail, providing shear reinforcement in a slab with minimal fixing effort.
Aspect ratio (β)
The ratio of long to short column dimension, which reduces punching capacity when it exceeds 2.
Scientific & Standards References
ACI 318-19 §22.6 — Two-Way Shear Strength — American Concrete Institute
ACI 318-19 §8.4.4.2 — Factored Two-Way Shear Stress with Moment Transfer — American Concrete Institute
ACI 421.1R — Guide for Shear Reinforcement for Slabs — American Concrete Institute
EN 1992-1-1 §6.4 — Punching shear — CEN
fib Bulletin 12 — Punching of Structural Concrete Slabs — International Federation for Structural Concrete
Conclusion
Punching shear is checked on a perimeter d/2 from the column face, with the concrete contribution Vc = 0.33√f'c·bo·d and a resistance factor of 0.75. Effective depth dominates because it enters twice, widening the perimeter and deepening the resisting section together — which is why 33% more depth buys 48% more capacity, and equally why 20 mm of fixing tolerance costs 17%. Two omissions matter more than anything the calculation includes: unbalanced moment transfer, which adds eccentric shear to one face of the perimeter and governs at most edge columns, and the truncated perimeter at edges and corners. Both are where flat slabs actually fail, and neither is covered here.
Check your own connection above, then sweep the effective depth in the chart to see how steeply capacity responds.